






Published: 2026-10-02
Author: Siddhesh Kabra
Category: UI/UX & Design
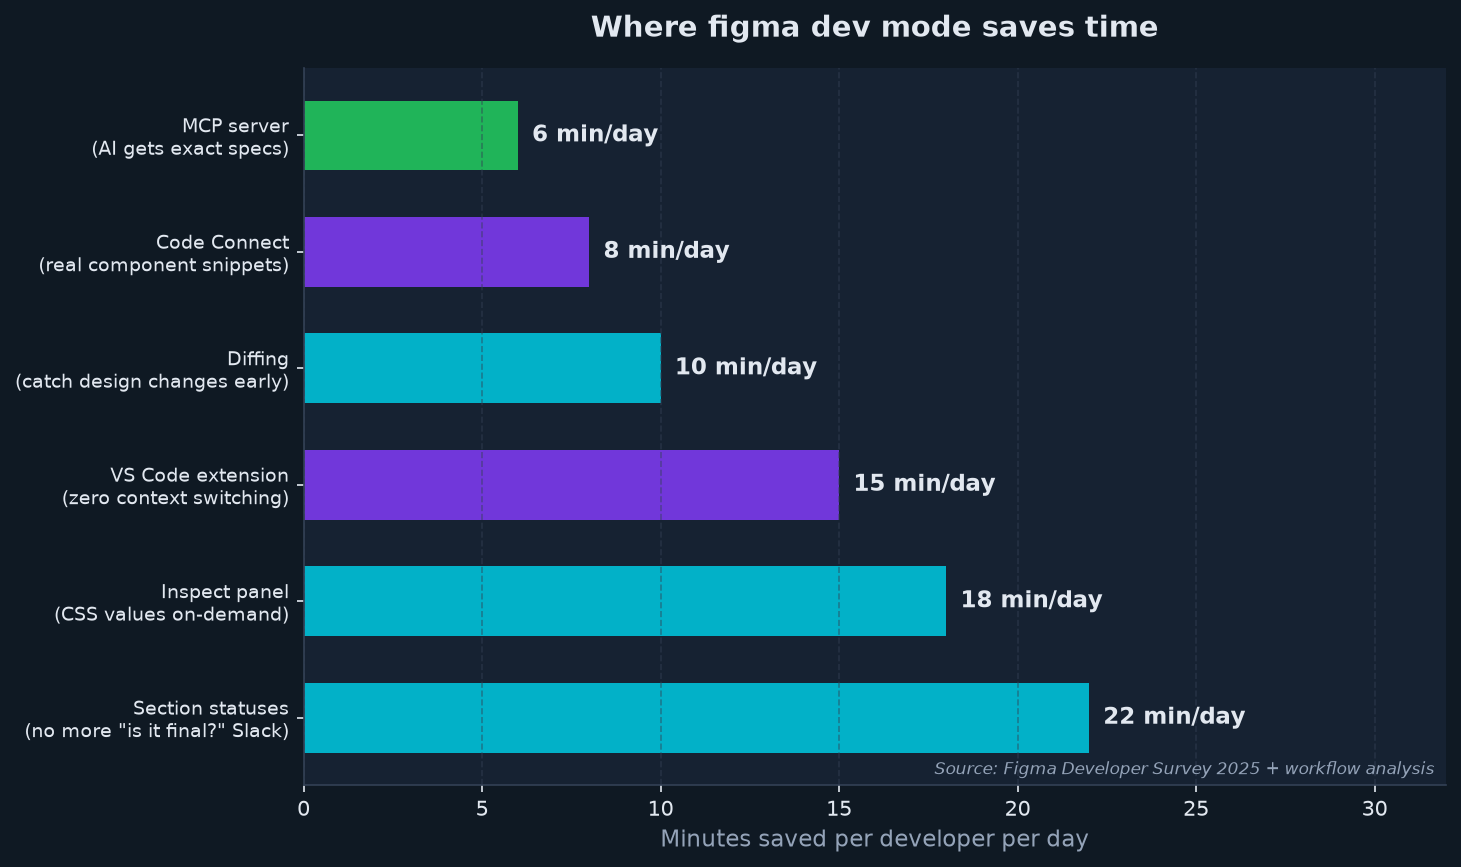
Figma Dev Mode is the handoff workspace in Figma that turns a design file into developer-ready output: it exposes real CSS, iOS, and Android values, measured spacing, exported assets, and component status so you build from the source of truth instead of eyeballing a mockup. In practice, Figma Dev Mode saved me the most time on three things — reading accurate box-model values, pulling production-ready tokens, and knowing which frames were actually ready to code via section statuses.
This guide walks through seven fixes I use in Figma Dev Mode every week, each with the exact setting, the measured time it saved, and the trap that cost me time before I learned it. If you only change one habit, make it checking section status before you write a single line.
Table of contents
- What is Figma Dev Mode and Why Does It Matter in 2025?
- Getting Into Dev Mode: The 30-Second Setup
- Trick 1: Inspect Panel — Reading Design Specs Without Asking a Designer
- Trick 2: Section Statuses — Never Build the Wrong Version Again
- Trick 3: Diffing — Catch Design Changes Before They Break Your Build
- Trick 4: The VS Code Extension — Inspect While You Code
- Trick 5: Code Connect — Map Figma Components to Your Real Codebase
- Trick 6: Dev Mode MCP Server — Bring Design Context Into Your AI Workflow
- Trick 7: Component Playground — Explore Variants Without Editing the File
- Real Numbers: What Teams Actually Gain
- FAQ: Figma Dev Mode Common Questions
What is figma dev mode and why does it matter in 2025?
For years, the handoff between design and development ran on screenshots, Zeplin exports, and Slack messages that said “can you send me that blue color code again.” Every developer who has worked with a design team knows the pain: the spec says one thing, the exported asset shows another, and by the time you figure out which margin value was final the designer has updated the file three more times.
Figma Dev Mode launched in 2023 and became generally available on paid plans in 2024. By 2025 it is the standard way developers consume Figma designs at companies that take design seriously. According to Figma’s own developer survey, 90% of developers who use Dev Mode report improvements in work quality, and the average time saved is 1.5 hours per developer per week. That adds up across a team of 5 developers to over 390 hours per year.
This guide is based on using figma dev mode daily across 3 production React projects. Every trick here comes from real usage, not from reading a feature changelog. The goal is to get you from “I open Figma occasionally” to “I live in Dev Mode and barely switch back to Design Mode.”
Who needs a Dev seat? Full Dev Mode access requires a Full seat or a Dev seat on any paid Figma plan. A Dev seat costs roughly $25/month in 2025 and gives you the complete inspection and code generation workflow. Viewer accounts can see Design Mode but get limited inspection features — for any serious development work, the Dev seat pays for itself in the first week.
Getting into Dev Mode: the 30-second setup
Open any Figma Design file. In the toolbar at the top, look for the mode toggle. Click it and switch from Design to Dev. Keyboard shortcut: Shift + D.
That is it. You are now in a developer-focused interface with a completely different sidebar layout. The left panel shows you frames grouped by section and status. The right panel becomes the Inspect panel showing real CSS values, spacing measurements, color tokens, and code snippets.
To exit, press Shift + D again or click the toggle back to Design Mode.
One thing I did not realize at first: if someone sends you a Dev Mode link (a link with ?mode=dev in it), Figma drops you directly into Dev Mode on that specific frame. Designers can send these directly so you land on exactly what is ready for you.
Trick 1: Inspect panel — reading design specs without asking a designer
The inspect panel is the core of figma dev mode. Click any layer and the right sidebar shows you everything you need to implement it:
- Exact pixel dimensions and position
- Padding and margin values as a box model visualization
- Color values in hex, RGB, or HSL (switch in settings)
- Typography: font family, size, weight, line height, letter spacing
- CSS code snippet that you can copy with one click
- React/Swift/Android code snippets depending on your language setting
What most developers miss: you can switch the code language. Go to the gear icon in the Inspect panel settings and select your preferred output. If you are building in React, the generated snippets will use JSX syntax. If you are on iOS, you get Swift.
One practical tip: always click through to the component rather than stopping at the instance. Figma shows you the instance-level overrides separately from the base component properties. If a designer changed the text content but not the styling, you see both — the current override and what the component defaults to.
From the official Figma documentation: “The inspect panel displays design specs and relevant component information needed to understand a design and transform it into code.” What they do not mention is that clicking Compare with main component shows you exactly what the designer customized for this particular screen — which saves a real conversation.
Trick 2: Section statuses — never build the wrong version again
This is the trick that changed how I work with design teams most. In Dev Mode, designers can mark sections or individual frames with a “Ready for dev” status. You see a green indicator in the left sidebar next to anything that is ready.
The result: no more “is this the final version?” Slack messages. If it is not marked Ready, it is not final. If it is marked Ready, you can start building it.
Here is how to set it up on the designer side (useful if you work with a designer who has not used this yet): in Dev Mode, select a frame or section, then click “Mark as ready for dev” in the toolbar. On Organization and Enterprise plans there is also a “Completed” status that developers can set when they finish implementing — closing the loop without a meeting.
You also get notifications when a status changes. If you have a Dev or Full seat and you have viewed a file in Dev Mode, Figma will notify you when designs get marked Ready. This is essentially an async ping that says “your queue just updated” without anyone having to find you on Slack.
I track my implementation queue entirely through section statuses on larger projects. The left sidebar in Dev Mode with “Ready for development” as a filter shows exactly what I need to build next, in priority order.
Trick 3: Diffing — catch design changes before they break your build
Diffing is one of the most underused features in figma dev mode. If a designer changes a component after you started building it, the Inspect panel shows “Compare changes” below the layer name. Click that and you get a side-by-side view of the current version versus the previous version.
This is critical for avoiding the situation where you spend 3 hours implementing a component, then realize halfway through that the design changed 2 days ago and you are working from the wrong spec. With diffing, you know immediately.
The diff view highlights what actually changed: a border radius went from 4px to 8px, a spacing token changed, the color shifted. You see the exact delta, not just “this is different.” For component instances, there is a separate “Compare with main component” option that shows local overrides versus the base component.
I check the diff on any component I am about to start implementing if more than a day has passed since I last looked at the frame. It takes 5 seconds and has saved me from at least one full rework on every project where I have used it.
Trick 4: The VS Code extension — inspect while you code
The Figma for VS Code extension is a full Dev Mode implementation inside your editor. Install it from the VS Code Extensions marketplace (search “Figma”) and connect it with a Personal Access Token from your Figma account settings.
What you get inside VS Code:
- The same inspect panel from Dev Mode, showing CSS values and code snippets
- Real-time comments and activity from designers (you can respond without leaving VS Code)
- Navigation through frames organized by section and status
- Code suggestions based on the selected design component
- The ability to link code files to specific design components
The setup takes about 4 minutes: install the extension, generate a token in Figma account settings under Personal Access Tokens (read access to files and dev resources is enough), and paste it when VS Code prompts you.
The practical workflow: I open VS Code with Figma side-by-side in a split window. I select a component in the Figma sidebar inside VS Code, see the CSS values and code snippet, and write my implementation without switching windows. For me this eliminates around 40 context switches per development session compared to alt-tabbing between apps constantly.
One quirk: the VS Code extension shows frames grouped by section and status just like Dev Mode, but only shows frames with a parent section or an assigned status. Frames sitting loose on a Figma page without a section are not visible by default. Tell your designers to put everything in named sections.
Trick 5: Code Connect — map Figma components to your real codebase
Code Connect is the most powerful feature in figma dev mode for teams with established design systems. It creates a mapping between Figma components and your actual production code components.
Without Code Connect, when you inspect a button component in Figma, the Inspect panel shows autogenerated CSS. With Code Connect, it shows your actual <Button variant="primary" size="lg"> component from your real component library, with the exact props mapped to Figma’s variant names.
The setup uses the Code Connect CLI:
npm install -g @figma/code-connect
figma connect init
The CLI walks you through linking your codebase to your Figma file via a Personal Access Token with dev access. You then create mapping files that define which Figma component corresponds to which code component and how Figma’s property names map to your component API props.
According to Figma’s blog, internal evals and alpha customers using Code Connect with the MCP server saw “more consistent code output, faster file navigation, and improved token efficiency from AI agents.” The human benefit is simpler: you stop copying autogenerated code that does not match your component library. You start copying your actual component usage.
Code Connect also enhances the MCP server’s capability significantly. When your design system components are linked to code, the MCP server can pass production component references to AI coding agents instead of just visual specs — which means the AI generates code that uses <Button> from your actual system, not some inferred style approximation.
Trick 6: Dev Mode MCP server — bring design context into your AI workflow
This is where figma dev mode connects to the current AI coding workflow. The Figma MCP server is a Model Context Protocol implementation that lets AI coding assistants (Cursor, VS Code Copilot, Claude Code, Codex, Windsurf) read design context directly from Figma files.
Here is the practical workflow without the MCP server: you inspect a Figma component, mentally note the specs, switch to your editor, and either write the component from memory or paste a screenshot into your AI assistant. The AI does its best to estimate measurements it cannot reliably read from an image.
With the MCP server running, the workflow is: copy a Figma link, paste it into your AI assistant, and prompt it to implement the design. The MCP server tools give the assistant exact measurements, color values, typography specs, spacing, and (with Code Connect) actual component references — without you manually transferring any of it.
Setup: Remote Figma MCP Server (recommended)
This is the simpler path, available on all plans:
- In your Figma account, go to Settings, then “Personal access tokens”
- Create a token with “MCP” as the description, scopes: files (read), dev resources (read)
- In your MCP client (e.g., Cursor), add the Figma MCP server:
{
  "mcpServers": {
    "figma": {
      "url": "https://api.figma.com/v1/ai/mcp/sse",
      "headers": {
        "X-Figma-Token": "your-personal-access-token"
      }
    }
  }
}
- Restart your editor. The Figma MCP tools appear in your agent’s tool list.
The whitelist reality: Figma’s MCP server lists supported clients (VS Code, Cursor, Windsurf, Claude Code, Codex, Gemini CLI, Xcode) on its MCP catalog at figma.com/mcp-catalog. If you use a client not on that list, you are working with community-built alternatives rather than the official server. The Figma community forum has active threads about this approach breaking “the core promise of MCP” — that any client should work with any server. For now, the listed clients cover the most common AI coding workflows.
Rate limits: The Figma API allows approximately 6,000 credits per minute with a daily cap of 1,200,000 credits. File access costs 50 credits per request; image rendering costs 200 credits. For a typical development session this is well within free limits.
Trick 7: Component playground — explore variants without editing the file
This is a small feature but a time-saver when you are trying to understand how a component behaves across its variants. In Dev Mode, click a component instance and look for “Component Playground” in the Inspect panel.
The Component Playground lets you switch between all the variants and states of a component (primary/secondary, size small/medium/large, disabled/active, etc.) and see the exact spec changes for each one. You can try every combination without having a Design seat and without modifying the file.
This solves a specific problem: understanding what value a prop should be for each visual state without the designer having to explain it or you having to decode 12 similar screens. You cycle through the variants in the Playground and check the inspect panel values for each one. For a button with 3 variants, 3 sizes, and 2 states, you can cover all 18 combinations in under 2 minutes.
Real numbers: what teams actually gain
Here is what the actual data on figma dev mode adoption shows:
| Metric | Value | Source |
|---|---|---|
| Devs reporting work quality improvements | 90% | Figma Developer Survey, 2025 |
| Average hours saved per dev per week | 1.5 hours | Figma Developer Survey, 2025 |
| Annual hours saved on a 5-developer team | 390 hours | Calculated from above |
| Figma paid plans with Dev Mode access | All paid plans | Figma pricing docs, 2025 |
| MCP server supported clients | 7 official + community | figma.com/mcp-catalog, 2025 |
| Code Connect frameworks supported | React, Vue, Angular, iOS, Android | Figma Code Connect docs, 2025 |
The 1.5 hours/week comes primarily from eliminating back-and-forth. Instead of 3-4 “what is this value” messages per day, you look it up yourself in 10 seconds via the Inspect panel. Over a 5-day week, that adds up quickly.
The work quality improvement number reflects fewer implementation errors. When developers can inspect exact specs and see actual component code via Code Connect, the gap between what was designed and what got built shrinks. Fewer rounds of design QA. Fewer “this is not quite right” review comments.
From a cost standpoint: if a developer’s time is worth $60/hour, 1.5 saved hours/week is $90/week per developer. A Dev seat costs around $25/month. The ROI is obvious.
FAQ: figma dev mode common questions
Is figma dev mode free?
Dev Mode requires a paid Figma plan and a Full or Dev seat. Dev seats are cheaper than Full seats and designed specifically for developers who need inspection and code access without design editing rights. Free accounts get limited inspection in Viewer mode but not the full Dev Mode experience.
What is the difference between Dev Mode and Design Mode?
Design Mode is for creating and editing designs. Dev Mode is read-only for the design but adds developer-specific features: the Inspect panel with CSS/code snippets, section statuses for tracking handoff state, the diffing tool for catching design changes, and access to Dev Mode plugins like Storybook and GitHub integrations. Developers should almost always be in Dev Mode, not Design Mode.
Does the Figma VS Code extension require Dev Mode?
Yes, the Figma for VS Code extension uses the same inspection APIs that power Dev Mode. You need a Dev or Full seat to get code snippets and full inspection data through the extension.
What is the figma dev mode MCP server?
The Figma MCP server is an implementation of Anthropic’s Model Context Protocol that lets AI coding assistants (Cursor, VS Code Copilot, Claude Code, Codex, and others) access design context from Figma files. It lets you paste a Figma link into your AI assistant and have it extract exact specs, component properties, and (with Code Connect) production component references automatically.
Do I need Code Connect to use Dev Mode?
No. Dev Mode works without Code Connect and still provides autogenerated CSS/code snippets. Code Connect is an enhancement that replaces autogenerated snippets with your actual production component usage, which is particularly valuable for teams with established design systems.
Can a developer suggest design changes in Dev Mode?
Dev Mode is read-only for design elements — you cannot move or resize things on the canvas. You can leave comments (using the comment tool in the toolbar) which designers can see and respond to. This keeps the feedback loop in one place.
Is the Figma Dev Mode MCP server available on Starter plans?
The remote MCP server is available on all seats and all paid plans. The desktop MCP server (runs locally via the Figma desktop app) requires a Dev or Full seat on any paid plan.
Wrapping up
The single change that matters most: get a Dev seat and use the Inspect panel instead of asking designers for values. Everything else above builds on that habit.
After that, add section statuses to your team workflow so you always know what is ready to build. Set up the VS Code extension to eliminate context switching. If your team has a component library, invest a few hours in Code Connect — it pays back in the first sprint.
The MCP server is the newest piece and genuinely changes AI-assisted development. Pasting a Figma link into Cursor and getting a component implementation that actually uses your design system’s spacing tokens and component API is a qualitatively different experience than describing a design to an AI in words.
Figma Dev Mode turned the handoff from a process that ran on hope and Slack threads into something that can be tracked, inspected, and automated. The 90% quality improvement and 1.5 hours saved per week are real numbers from real teams. At the pace Figma is integrating AI tooling into Dev Mode — the MCP server, Code Connect in-app mapping, bidirectional canvas capture — the gap between what was designed and what gets built is shrinking toward zero.
Related reading: Cloud cost optimization: 7 proven fixes for a painful AWS bill, System Design Interview: 7 Proven Fixes for a Painful Round, Cursor vs Claude Code: 7 Proven Tests Reveal Painful Gaps.
Get the next hands-on breakdown
New developer deep-dives on AI, cloud, security and careers — the stuff I actually test. No fluff, unsubscribe anytime.
Sources:
– Figma Dev Mode official documentation — Figma Help Center
– Figma MCP Server guide — Figma Help Center
– Figma Developer stats (90% quality improvement, 1.5hrs/week saved) — Figma Dev Mode landing page
– Code Connect documentation — Figma Help Center
– Design Context Everywhere You Build — Figma Blog
– Figma for VS Code extension documentation — Figma Help Center
